 Skip to content
Google Tag Manager is the best friend of many people who don’t know the finer points of the digital landscape. Perhaps you own your own business, manage more than just a client’s digital offerings, or run a blog that you want to perform better. Perhaps you’re just starting off in the digital realm, and tagging is something you will inevitably have to know, but you don’t know where to begin.
Unfortunately, Google Tag Manager is not perfect, and in many cases, the best-practice implementation of tags might require one to have prior knowledge of the data layer, Javascript, Jquery, and Ajax plug-ins. There is no need to be intimidated, however; there are two tag implementations that anyone with basic computer skills can apply to most common interactions on a website as to create Analytics conversions. By reading this quick tutorial on {{Click URL}} and Page Destination goals, you can gain an immense amount of utility for almost no learning effort.
Google Tag Manager {{Click URL}} Conversion Goals
The ‘{{Click URL}}’ variable is probably the most useful aspect of Tag Manager. With it, you can tag video views, file downloads, button clicks, link clicks, and even some form submissions! After all, most conversions are initiated by something the user clicks, and whether that click is to start a video, submit a form, or follow a link, these actions are usually coded the same way, by embedding a hyperlink in the source code with “a href=.” Because this is such a common element, a sizeable portion of the important conversions you will track are triggered by the ‘{{Click URL}}’ variable in Google Tag Manager.
Before proceeding, it is important that you know how to inspect elements of a web page to see the underlying code. This is a lot simpler than it sounds, since all you are looking for is a spot that a user is responsible for clicking on in order to complete an interaction. For our discussion, the code element you should be looking for is “a href=” or simply “a=.” This is the HTML name for a hyperlink, and is the element that is most often responsible for completing common user interactions like a hitting a ‘Submit’ or ‘Buy’ button. Buttons, video plays, and file downloads will usually be linked to a certain, unique URL that, when clicked, completes the interaction either on a new page, or the same one.
To find the information you need to make a tag with the Inspect tool, all you need to do is right click on the location where the conversion is carried out and hit “Inspect.” Since most conversions are the result of somebody hitting a button like “Submit,” or “Sign Up,” or even the play button on an embedded video, you will only ever have to look for the “a href=” for the element that they click when they click in order to complete the interaction.
So let’s dive in!
Step 1: Open Tag Manager and enter the view of the property you want to tag
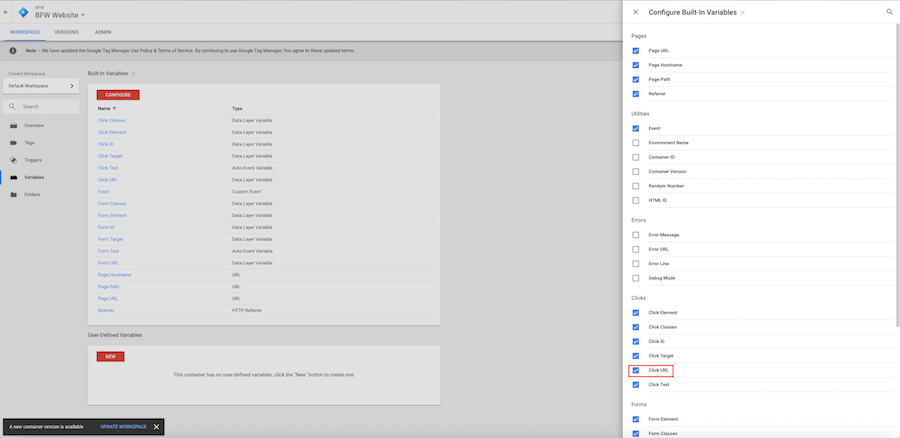
Step 2: Click “Variables->configure->enable ‘Click URL’ under ‘Clicks’
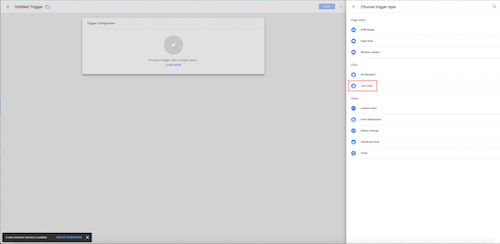
 Step 3: Click “Triggers->New->select “Just Links”
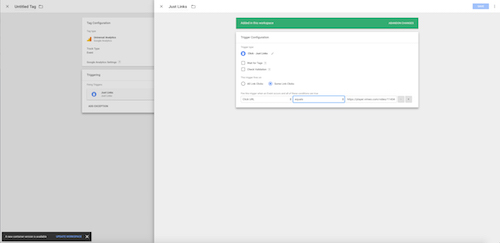
Step 4: Select “Some Link Clicks”
 Step 5: Click the dropdown titled “Fire this trigger when…” and select Click URL, and next to it, select “Equals”
Step 6: Go to the conversion you want to track and inspect the submit button, play button, sign-up button, download link, depending on the circumstances.
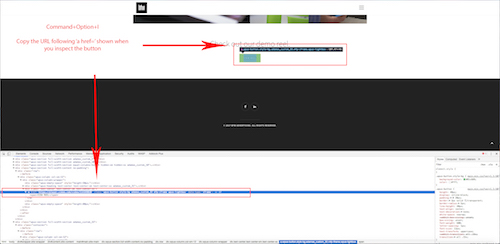 Step 7: Look for “href=” followed by a URL in quotation marks. Copy that URL and paste it into the last box in the trigger setup window in Tag Manager and save the trigger
Step 8: Click “Tags” in Tag Manager, and create a new Universal or Classic Google Analytics tag type
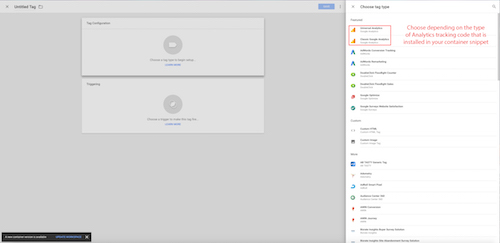
Step 9: Select “Event” as track type, and then select “Advanced Settings->Tag Firing Options -> Once Per Page (this will prevent double clicks from registering as two conversions)
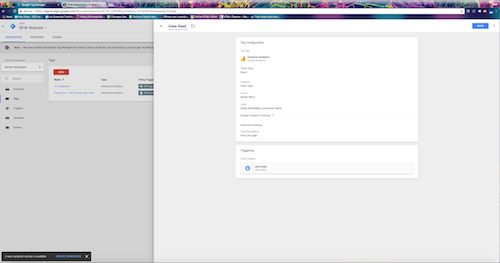
Step 10: Click the “Triggering” window and add the trigger you set up for the conversion
Step 11: Hit “Save”
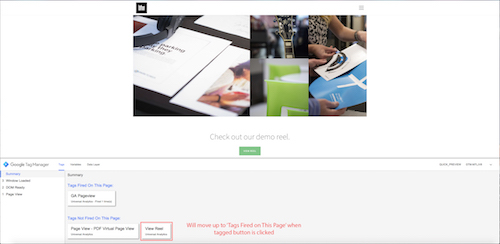
Step 12: Hit “Preview” on the top right of your Tag Manager view, and an orange box should appear in a refreshed window.
Step 13: Open a new tab in the same browser window containing the Tag Manager view you were just using, and go to the location of the conversion that just just set up.
Step 14: You should see a Google Tag Manager debugging window with all of the tags that are set up for that account. Click on the conversion you just set up, and you should see your tag fire in the debug window under “Tags Fired on This Page”
 Step 15: Return to your Google Tag Manager View and hit the red “Publish” button. If you do not, the tag you created will exist only in your Tag Manager account. This is a very easy step to forget.
The last part of the process is setting up the Analytics goal that corresponds to the tag you just set up. This is simply a matter of logging into Analytics and doing a little transcribing, so don’t lose your focus yet!
To set up the corresponding Analytics goal, you must:
- Log into the Analytics property of the site you just tagged
- Go to Admin->Goals->+New Goal
- In “Goal setup,” select the type of goal that the conversion you just created signifies.
- In “Goal Description,” select “Event” as the goal type, and hit continue
- Transcribe the information that you put for the tag’s category, action, and label when you created it in Google Tag Manager. If you specified a value for the goal add that as well (For example, if it was an E-commerce transaction)
- (Optional) If you want to specify a funnel, copy and paste the URL of the page where the conversion you want to track is located. An example of when you might do this if the conversion URL is located in additional locations elsewhere on your site and you don’t want to track it there.
You’re done! If you entered the correct tracking ID of your analytics account when setting up the tag, then you should start to see the conversions start to roll in within 24 hours (they are not shown right away, so don’t worry if you don’t see conversions immediately).
It is important to note that for video views, form submissions, and anything else you might track with the Click URL, a conversion is recorded every time the button is clicked, regardless of user intent. This means that if someone accidentally clicks twice, or clicks without putting anything in, then it will count as a conversion. When looking at the Analytics, you wouldn’t see the difference between an accidental double-click and two people each submitting the form once. This is why it is important to only fire the tag once per page, rather than once per event, since the only requirement of the event is that someone click its location on the page.
Creating Form Fill Conversions
Tracking form fills is just as easy. Create your tag in the same way that you did above. However, instead of choosing the ‘Just Links’ for the trigger, click ‘Form Submission’.
If you have a particular landing page where you want to track form fills, make sure you specify that you only want the trigger to fire on that page. To do this, click ‘Some Forms’ next to ‘This trigger fires on.’ Select ‘Page URL’ in your variables list. Click ‘Equals’ for the condition, and then paste your page URL in the final box.
If you are using URL parameters to track your campaign, it’s a good idea to use ‘Starts With’ for the condition. That way, the page URL criteria will still be filled. It’s that easy!
Setting up Page View Conversion Goals with Google Tag Manager
Along your new tagging travels you will inevitably encounter data-layer plug-in elements like Ajax and Jquery. If you encounter a button without an “a href=” link, and instead see “Input Type=”Submit,” or “Value=Submit,” then you know you’ve found one; elements such as these function by sending user input through the same data layer in which Tag Manager tags operate, and therefore require more advanced implementation than many have the patience to learn. When one clicks a plug-in element, the page will usually prompt you with some sort of confirmation that the information has been transferred, like “Thanks for your Input!” or “Sent.” They are often used to transfer data that is the result of an open-ended response, like a log-in, questionnaire form, email submission, or account creation.
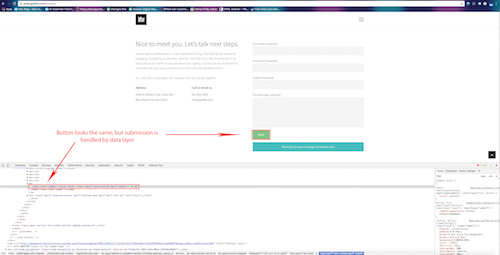 Implementing conversions such as these beyond the scope of this tutorial, and more than many people have time to learn. Fortunately, there may be an easy solution to your problem. Because plug-in elements are not as obvious when they are interacted with, sites will often have a “Thank You” page to let users know that they have done what they needed to do. Try filling out the form or clicking the element in question to see if there is such an HTML-equivalent response code. You may be redirected to a new page, or your page may refresh with a file extension like “.aspx.” What you are looking for is a page that is available only to people who have completed the plug-in submission. As previously stated, this should be immediately obvious. If not, then you’re most likely out of luck, and will have to turn to learning the Data Layer Variable to track such conversions. There are plenty of articles out there that can show you how to do this, but it will take more than five minutes to learn!
Since our discussion focuses on putting you on the fast track to conversion tagging, you don’t even need to use Tag Manager here, since the Google Analytics interface allows very simple tagging for this scenario. All you need to do is log into the Analytics account of your website and create a page view conversion tag for the ‘Thank You’ page!
Here’s how:
- Log into Google Analytics
- Navigate to Admin->Goals->New Goal
- In ‘Goal setup,’ select the type of goal that the ‘Thank You’ page view signifies (it doesn’t really matter which one you use)
- In ‘Goal Description,’ select “Destination” as the Goal type, and paste the URL of the Thank You/Confirmation page in the “Destination” box
- Enable the “Funnel” feature, and paste the URL of the page where the completed form is located (this will prevent people from triggering a meaningless conversion when hitting the ‘back’ or ‘refresh’ buttons after the conversion is completed, since Analytics will simply record a conversion any time the page is viewed. By specifying the page that must be viewed before the conversion happened, you will reduce your chances of triggering non-conversions. This last point is why Page View conversions are not the ideal implementation.
You’re done! Since you didn’t use Google Tag Manager, you don’t even need to finish the tag by setting up a corresponding goal in Analytics! Now, how easy was that?